
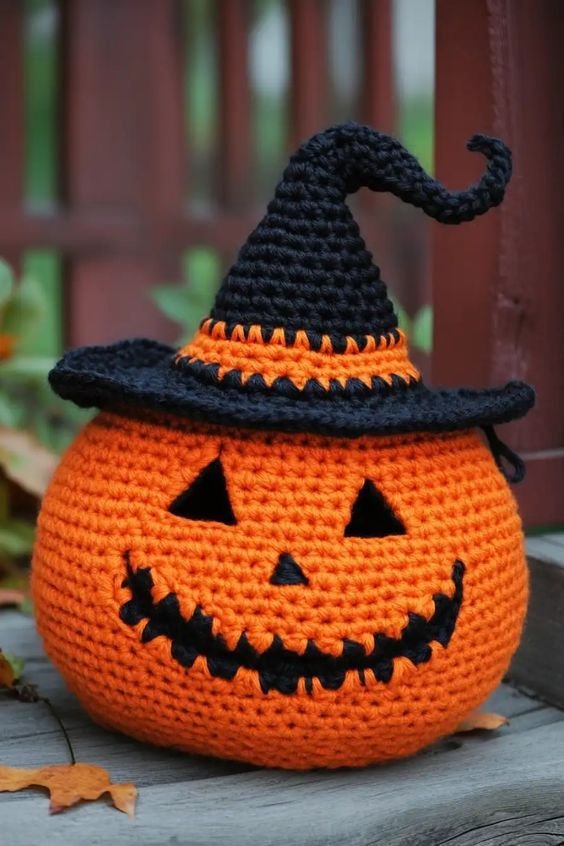
Create a spooky-cute Halloween decoration with this adorable crochet pumpkin! Featuring a bright orange body, a playful black jack-o’-lantern face, and a charming black witch hat with orange trim, this handmade project is perfect for Halloween decorating, gifting, or selling at craft fairs.
This crochet pumpkin is a fun project for anyone who loves handmade seasonal decorations. With basic crochet stitches, a little stuffing, and simple finishing details, you can create a unique piece that brings a festive Halloween atmosphere to your home.
Materials You’ll Need
– Orange yarn for the pumpkin body
– Black yarn for the witch hat, brim, eyes, nose, and mouth
– Bright orange yarn for the hatband
– Crochet hook suitable for your yarn
– Polyester fiberfill stuffing
– Yarn needle for sewing and embroidery
– Scissors
– Stitch markers
– Measuring tape, if desired
Optional: Use black felt for the facial features if you prefer not to embroider them.
Crochet Abbreviations
This pattern uses standard US crochet terminology.
– MR: Magic ring
– ch: Chain
– sc: Single crochet
– inc: Increase — work 2 single crochets into the same stitch
– dec: Decrease — crochet 2 stitches together
– sl st: Slip stitch
– BLO: Back loops only
– FLO: Front loops only
– st(s): Stitch(es)
Step 1: Crochet the Orange Pumpkin Body
Using orange yarn, begin with a magic ring and work 6 single crochet stitches into the ring.
Increase evenly in each round until you reach the desired width of the pumpkin. Once the base is wide enough, continue working single crochet stitches evenly around to build the rounded body.
When the pumpkin reaches the desired height, begin decreasing gradually to close the top. Before the opening becomes too small, fill the pumpkin firmly with polyester fiberfill.
Continue decreasing until the opening is closed. Leave a long yarn tail for shaping.
Tip: Keep your stitches tight and even so the stuffing does not show through the fabric.
Step 2: Shape the Pumpkin
Thread a long piece of orange yarn onto your yarn needle.
Pass the needle through the center of the pumpkin, bring the yarn around the outside, and pull gently to create a natural indentation. Repeat this process at evenly spaced intervals to form the rounded sections of a traditional pumpkin.
Adjust the tension carefully until the pumpkin has a plump, well-defined shape.
Step 3: Create the Jack-o’-Lantern Face
Use black yarn to create two triangular eyes, a small triangular nose, and a wide, curved smile with playful jagged edges.
You can embroider these features directly onto the orange body using a yarn needle. Alternatively, cut the shapes from black felt and attach them securely with suitable fabric adhesive.
Position the facial features evenly across the front of the pumpkin. Check the expression before securing everything permanently.
Step 4: Crochet the Black Witch Hat
Using black yarn, create a magic ring and work single crochet stitches into it.
Continue crocheting in rounds, increasing gradually to form a pointed cone. Keep the increases evenly spaced to create a smooth shape.
As the cone grows, gently bend the tip to one side to achieve the whimsical curved appearance shown in the reference image.
When the cone reaches the desired height, begin increasing more frequently to create a wide, slightly curved brim. Work the brim in rounds until it is large enough to sit securely on top of the pumpkin.
Fasten off and weave in the loose ends, leaving a yarn tail if you plan to sew the hat to the pumpkin.
Step 5: Add the Orange Hatband
Switch to bright orange yarn and crochet a decorative band around the base of the black cone.
Add a row of black stitches or small black accents along the edges to recreate the contrasting trim in the reference image.
Keep the band neat and evenly spaced for a professional finish.
Step 6: Assemble Your Halloween Pumpkin
Place the witch hat on top of the pumpkin, slightly tilted to one side.
Use a yarn needle and black yarn to sew the brim securely to the pumpkin. Adjust the curved tip until it creates the desired witch-hat silhouette.
Inspect the face, hatband, and brim. Weave in any remaining yarn ends and gently shape the pumpkin with your hands.
Your adorable crochet Halloween pumpkin is now ready to display!
Helpful Tips for the Best Results
– Choose a crochet hook that creates a firm fabric with your selected yarn.
– Count your stitches at the end of each round to keep the shape even.
– Stuff the pumpkin gradually to avoid lumps.
– Use stitch markers to track increases and decreases.
– Secure small decorative pieces carefully, especially if the pumpkin will be displayed around children.
– Experiment with purple, green, or white yarn to create your own Halloween color combinations.
Frequently Asked Questions
Can beginners make this crochet pumpkin?
Yes! Beginners who know how to make single crochet stitches, increases, and decreases can work toward this project. The curved hat tip and facial details may require a little extra practice.
Can I make the pumpkin in different sizes?
Absolutely. Use thicker yarn and a larger hook for a bigger decoration, or thinner yarn and a smaller hook for a miniature version. The finished dimensions will depend on your yarn, hook, and tension.
How long does it take to make?
The time depends on your experience and the size of your pumpkin. Allow several hours for crocheting, stuffing, decorating, and assembling the finished piece.
Can I sell the finished crochet pumpkin?
You can generally sell your own handmade finished item, subject to any applicable pattern license and local rules. Always check the terms of any specific pattern you follow.
Final Thoughts
This crochet Halloween pumpkin with a witch hat is a delightful way to celebrate the spooky season with handmade creativity. Its bright orange body, playful smile, and charming black hat make it a lovely addition to Halloween displays, autumn tables, and handmade gift collections.
Grab your yarn and crochet hook, choose your favorite Halloween colors, and enjoy creating your own festive pumpkin! 🎃🧶