
Halloween Crochet Witch Hat Pattern: A Spooky and Stylish DIY Decoration
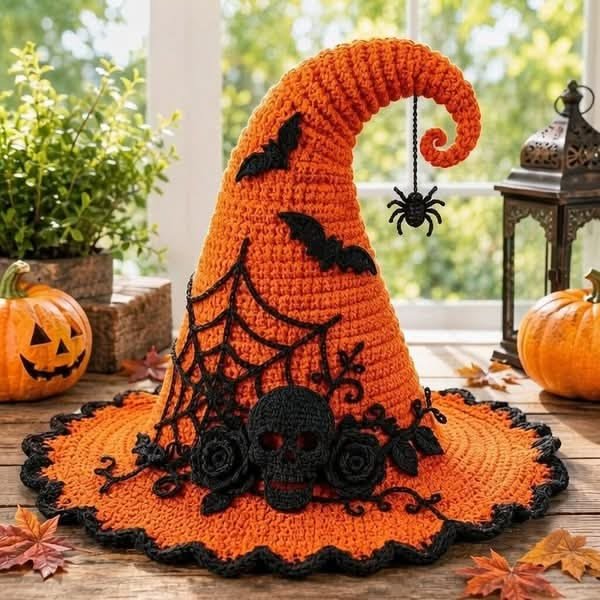
Get ready for spooky season with this stunning Halloween crochet witch hat! Featuring vibrant orange yarn, dramatic black edging, a curled pointed top, and adorable Halloween decorations, this handmade hat is the perfect project for anyone who loves festive crochet crafts.
Inspired by classic Halloween colors, this decorative crochet hat includes a wide brim, a dangling spider, black bats, a spiderweb design, and beautiful gothic embellishments. Display it as part of your Halloween decorations, use it as a centerpiece, or customize it to match your seasonal style.
In this tutorial, you’ll discover the materials, crochet techniques, and finishing ideas needed to create your own Halloween-inspired witch hat.
Materials You’ll Need
– Orange medium-weight yarn for the hat and brim
– Black yarn for the decorative edging and Halloween details
– Crochet hook appropriate for your yarn
– Yarn needle for sewing and weaving in ends
– Scissors
– Stitch markers
– Flexible stuffing wire or a small amount of fiberfill to help shape the curled tip, if needed
– Black felt or yarn for the bat and spider decorations
– Black thread for embroidered spiderweb details
Optional decorations: Small crocheted roses, leaves, a skull applique, or a hanging spider can make your witch hat even more unique.
Crochet Abbreviations
This pattern uses standard US crochet terminology.
– MR: Magic ring
– ch: Chain
– sc: Single crochet
– hdc: Half double crochet
– dc: Double crochet
– sl st: Slip stitch
– inc: Increase
– dec: Decrease
– BLO: Back loops only
– st(s): Stitch(es)
Step 1: Crochet the Pointed Hat
Begin with orange yarn and create a magic ring. Work six single crochet stitches into the ring and continue crocheting in spiral rounds.
Increase gradually and evenly to form a cone. As the cone grows, keep the stitches consistent so the fabric remains firm and neat.
Continue working until the cone reaches your preferred height. To recreate the curled tip in the reference image, gently bend the upper section to one side while shaping it. You may use a small amount of flexible support inside the tip if necessary.
Tip: A firm stitch tension helps the hat maintain its shape and gives it a polished handmade appearance.
Step 2: Make the Wide Brim
Once the cone is complete, begin increasing stitches around its base to create a flat, circular brim.
Work several rounds in orange yarn, distributing increases evenly so the brim expands without curling excessively.
For the dramatic scalloped edge shown in the reference image, finish with a decorative black border. You can use alternating slip stitches, single crochet stitches, or small shell-like edging to create a festive contrast.
Adjust the brim size according to whether you want a small decorative piece or a larger wearable-style hat.
Step 3: Add the Black Decorative Trim
Using black yarn, work a contrasting border around the brim. Keep the stitches evenly spaced for a clean finish.
You can also add a few black details around the base of the cone to make the orange fabric stand out.
For a more dramatic Halloween look, combine black edging with small embroidered curls, leaves, and decorative swirls.
Step 4: Create the Spiderweb Design
Use black yarn or embroidery thread to decorate one side of the hat cone with a spiderweb.
First, stitch several radiating lines from a common point. Then connect these lines with gently curved horizontal sections to form the web.
Keep the tension even and avoid pulling too tightly, which could distort the crochet fabric.
This simple decoration adds a spooky, handmade touch without requiring complicated crochet stitches.
Step 5: Add Crochet Bats and Roses
Create small black bat appliques using black yarn or felt. Attach them to the front and sides of the cone.
For an elegant gothic appearance, add black crochet roses with small leaves around the base of the cone. Arrange the decorations symmetrically or create an asymmetrical cluster for a more whimsical style.
You can also add a small skull applique to the center of the brim to match the Halloween theme.
Step 6: Make the Hanging Spider
To create the hanging spider, crochet a small black oval or ball for its body and head.
Add eight short black legs using yarn, thread, or carefully secured crocheted pieces. Attach a thin black yarn strand to the spider and sew the other end to the curled tip of the hat.
Adjust the length of the hanging strand until the spider sits at the desired height.
For safety, securely attach all small decorations, especially if the finished item will be handled by children.
Step 7: Shape and Finish Your Witch Hat
Weave in all loose ends with a yarn needle.
Gently shape the cone and brim by hand, making sure the curled tip and wide edge look balanced. Check that the decorative appliques, spiderweb, and hanging spider are firmly attached.
If the brim needs extra support, use a suitable washable craft insert or a carefully concealed flexible support that matches the intended use of the item.
Your Halloween crochet witch hat is now ready to display!
Tips for a Beautiful Finished Project
– Choose bright orange and deep black yarn for a traditional Halloween look.
– Use a smaller hook if you need a firmer fabric.
– Count your stitches regularly to keep the cone and brim symmetrical.
– Pin decorations in place before sewing them permanently.
– Use purple, green, or dark burgundy as alternative accent colors.
– For a wearable hat, check the fit and avoid rigid or sharp internal supports.
Frequently Asked Questions
Is this crochet witch hat suitable for beginners?
The basic cone and circular brim can be manageable for beginners who know single crochet, increases, and slip stitches. The curled tip, spiderweb embroidery, and decorative appliques may require additional practice.
Can I make this hat in different sizes?
Yes. Adjust the number of increase rounds, the height of the cone, and the width of the brim to create different sizes. Your yarn weight and crochet tension will also affect the final dimensions.
Can I use this design as a Halloween centerpiece?
Absolutely! A decorative crochet witch hat can look beautiful on a mantel, shelf, entryway table, or Halloween display. For a centerpiece, you can add extra stuffing or a suitable hidden support to help it stand upright.
Can I change the colors?
Of course! Orange and black are classic Halloween colors, but purple and black, green and black, or even white and silver can create a distinctive seasonal design.
Final Thoughts
This Halloween crochet witch hat is a creative way to celebrate the spooky season with yarn, imagination, and handmade charm. From the curled orange cone to the black scalloped brim, spiderweb embroidery, and hanging spider, every detail contributes to a memorable Halloween decoration.
Gather your favorite yarn colors, prepare your crochet hook, and create a witch hat that brings a little handmade magic to your Halloween celebrations!
Happy crocheting! 🎃🧶
Pattern note: This is a general project guide rather than a fully tested, stitch-by-stitch pattern. Exact stitch counts and finished measurements will depend on your yarn, hook, and desired size.